First connect your ComfyUI server and Comfy account. Then make an image, refine a frame, or direct a video. This guide takes you from setup to your finished work.
DreamForge needs two things: the address of a running ComfyUI server, and a Comfy account API key for its partner-model workflows. They go in different fields in DreamForge Settings.
A
Run ComfyUI
Install and start your own ComfyUI instance, then leave it running while you create. On the same Mac, a common address is http://127.0.0.1:8188; use the actual URL and port shown by your instance. A remote or network server must use HTTPS in DreamForge.
Sign in or register at platform.comfy.org. Open your profile’s API Keys page and create a Comfy account key. Copy it somewhere private; don’t share it or put it in the Server URL field.
DreamForge’s included image, video, edit, and AI-prompt partner workflows use your Comfy Credits when their paid nodes run. In ComfyUI, sign in under Settings → User, then open Settings → Credits to buy a top-up and check your balance. The credits belong to your Comfy account, not to DreamForge.
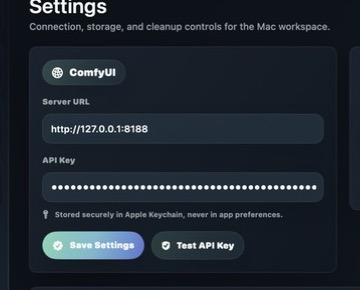
Open Settings from the lower-left sidebar. Put your running ComfyUI address in Server URL, paste the Comfy account key in API Key, then choose Save Settings. Use Test API Key to verify the key. A successful key test does not test the server address, so keep ComfyUI running too.
DREAMFORGE SETTINGSSERVER URL + API KEY
The key is masked in the app and stored in Apple Keychain. This screenshot contains no account key.
GOOD TO KNOW
Running ComfyUI on your Mac does not make partner models free: their cloud API calls use Comfy Credits. Costs vary by model and settings, and provider rules still apply.
02 / IMAGE
Find the frame.
In the Image tab, open Create. Pick an image model and size, write your prompt, and choose how many outputs you want. Add reference images when that model supports them; the next slot appears as you fill each one.
Use AI Prompt when you want help shaping an idea, or open Shot Builder for still-image direction. Then generate. Your results fill the Canvas and enter your library.
AN IMAGE PROMPT TO TRY
“A glass observatory overlooking the ocean at blue hour, warm interior lights, wide editorial composition, subtle sea haze.”
03 / REFINE
Make the frame yours.
Open Edit for the Magnific suite, GPT Image editing, and background removal. Use Board to collect visual references. Save a recipe when you want to return to a prompt, model, size, and Shot Builder setup.
TIP
Your Board can help bridge the Image and Video sides of the app, so a promising still can become a starting frame.
04 / VIDEO
Give it somewhere to go.
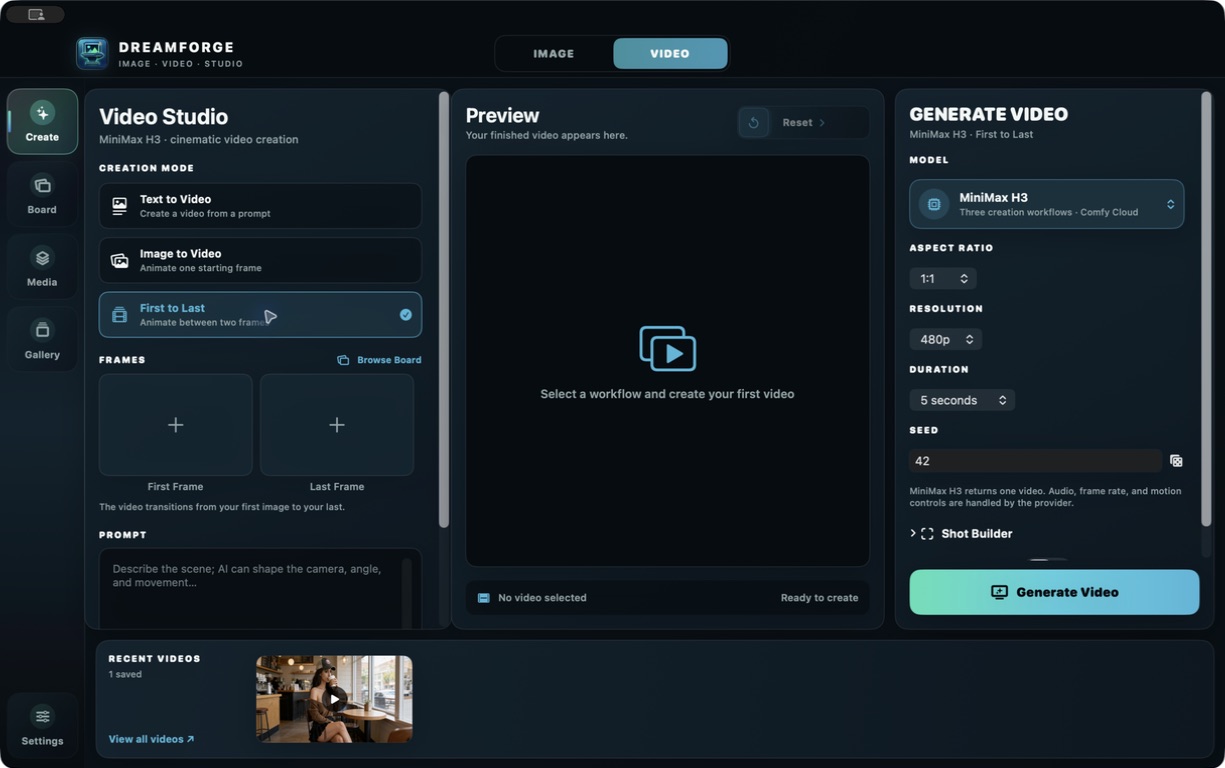
Switch to Video. Pick a model, then choose one of its available workflows: text to video, image to video, first-to-last frames, or a reference, continuation, edit, or audio mode where supported.
For a frame-based workflow, click a frame slot to choose from your created images or a file on your Mac. You can also open Video Board and assign an image to the active workflow. Write what changes in the scene, including camera angle and movement, or use AI Video Prompt and the video Shot Builder to help direct it.
IN THE APPFIRST → LAST
A VIDEO PROMPT TO TRY
“Begin in a quiet wide shot. Slowly dolly toward the observatory as the interior lights come on; keep the horizon steady and the movement gentle.”
05 / KEEP
Keep the good ones close.
Review recent creations as they arrive. Use Media to browse images or videos, and Gallery to keep your favorites organized. Open a result for a closer look, then bring it back into the next creation when inspiration strikes.
Working on more than one idea? Use the Workspace switcher in the top-right of the app to move between projects or choose New Workspace…. Main is your default library; each named workspace keeps its own media, Board, galleries, recipes, and prompt history. You can rename or remove a workspace in Settings → Workspaces.
YOUR CHOICE
You can choose whether the prompt is included in exported file information. DreamForge attribution remains with generated media.
QUICK ANSWERS
Setup, without the guesswork.
The server, key, and credits each have a different job. Here’s how they fit together.
Do I need to keep my ComfyUI server running?+
Yes. DreamForge sends jobs to the Server URL you saved. If ComfyUI is closed, unavailable, or listening on a different port, generation cannot start. Keep your instance open and use its actual address.
Is the Server URL the same thing as my API key?+
No. Server URL is where the workflow goes. API Key identifies your Comfy account for paid partner nodes. Create that key on Comfy’s API Keys page and paste it only into DreamForge’s API Key field.
If I run ComfyUI locally, why do I still need credits?+
ComfyUI itself can run locally, but the partner models offered in DreamForge call outside providers. Those paid nodes spend Comfy Credits when they execute. Merely opening DreamForge or choosing a model does not spend credits; the amount for a run depends on the model and options. Read Comfy’s pricing explanation.
Where do I buy credits or see what I used?+
Sign in to your Comfy account in ComfyUI, then open Settings → Credits to purchase top-up credits, see your balance, and review credit history. Comfy handles the purchase; it is separate from DreamForge. Comfy currently says purchased top-up credits expire one year after purchase. See Comfy’s illustrated credit guide.
What if “Test API Key” works but a render fails?+
The button checks whether Comfy accepts your key; it does not check your saved server URL. Confirm that ComfyUI is running, the address and port match your instance, and your Comfy account has credits. For a remote server, use HTTPS. If a particular model still fails, check that your ComfyUI version supports its partner node.
READY FOR THE NEXT TAKE?
Pick the right tool for the idea.
See every image and video model currently available in DreamForge.